If you work behind a proxy, when you try to add a NuGet package to your Visual Studio project, probably this message will compare in the output tab:
error: Failed to retrieve information from remote source ...
error: Response status code does not indicate success: 407 (Proxy Authentication Required).
It means that NuGet is trying to download the package, but the proxy is blocking him.
Open the file C:\Users\[YOUR_USER_NAME]\AppData\Roaming\NuGet\NuGet.Config and add inside the <configuration> <\configuration> tag the following:
Create a ASP.NET Core Web Application (.NET Core) project and select the template Web Application.
In this example I will create a simple Web Application to model a simple school. I will call the project SchoolWebApp.
Install the packages for EF Core tools and SqlServer provider as seen in the previous post.
Create the model
Create a Model folder. Inside this folder, create a Student.cs file and will insert the following properties:
Every property of the class will be mapped as a column with the same name in the Student table (which will be automatically generated).
Code First infers that a property is a primary key if it’s named one of the following:
Class name followed by “Id”.
“Id”
Create the context
To generate the database table, it’s not sufficient to create the Student class. We also need to create a DbContext containing a DbSet class (exposing it as a property) of type Student.
Doing this, EF will generate a table named Students (class name + “s”) and a table for each type referenced by the Student class (in this case nothing).
Let’s create a Persistence folder in the project root and create inside it a SchoolContext.cs file. This file will contain the SchoolContext, which extends the DbContext class.
This class will allow us to generate the database in an automatic way.
Add the following constructor and property to the class:
Add also the using Microsoft.EntityFrameworkCore; at the beginning of the file.
Register the context with DI
In order to use the SchoolContext in the our web application, we need to register it as a service.
The classes of the application (such as controllers) which requires the SchoolContext are provided by Dependency Injection through the class contructor.
Open the Startup.cs class and add the following lines at the beginning of ConfigureServices(IServiceCollection services) method.
Add also the using Microsoft.EntityFrameworkCore; at the beginning of the file.
Generate the code to create the database and execute it
We are finally ready to automatically generate the code, which once executed will create the database.
Open the Package Manager Console and enter the command Add-Migration followed by the name you want to give to this migration. For example:
Add-Migration CreateStudentsMigration
Let’s look at the project directory: a new Migration folder has been generated.
It contains 2 classes:
20161124115014_CreateStudentsMigration.cs
SchoolContextModelSnapshot.cs
Analyze the content of the first file.
It contains a class CreateStudentsMigration (the name is the same of the one entered as argument of Add-Migration command), which has 2 methods:
Up
Down
The Up method is responsible of the creation of the Students table in the database. It creates the table, the columns and the contraints inferred by the class model.
The Down method is responsible to delete the table once it’s not longer needed.
Now it’s time to generate the database. With EF core is a very simple operation, you only have to run the
Update-Database
command to apply the migration.
View the created database
Of course, we are very interested in viewing the created database.
To do so, open the SQL Server Object Explorer tab in Visual Studio, expand the (localdb)\MSSQLLocalDB selection, Database folder and… here’s our brand new SchoolDatabase.
Expand it, go into the Tables folder and you can find the dbo.Students table!
Database view
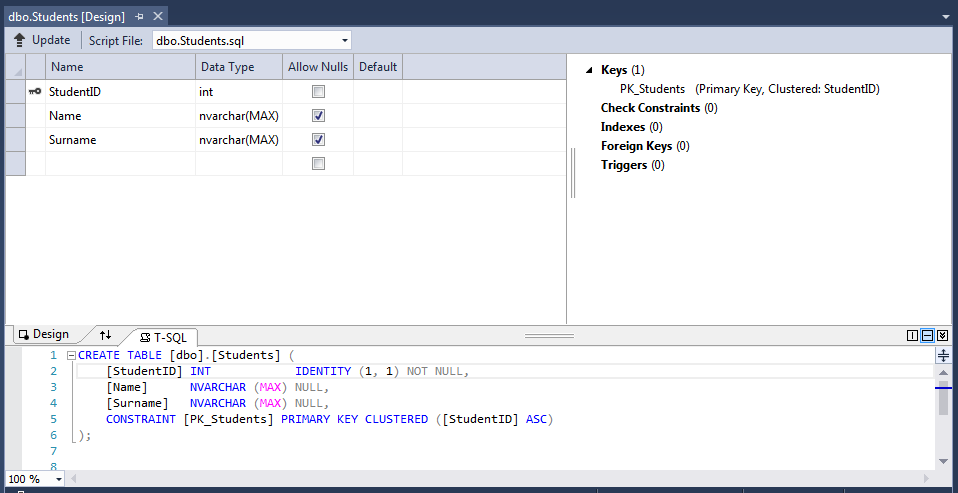
Double clicking on the dbo.Students table it will open the Design window. Here you can see the table structure and the SQL commands that created it.
Students table view
Well done! We have generated the relational database from our class model!
Adding a class to the model
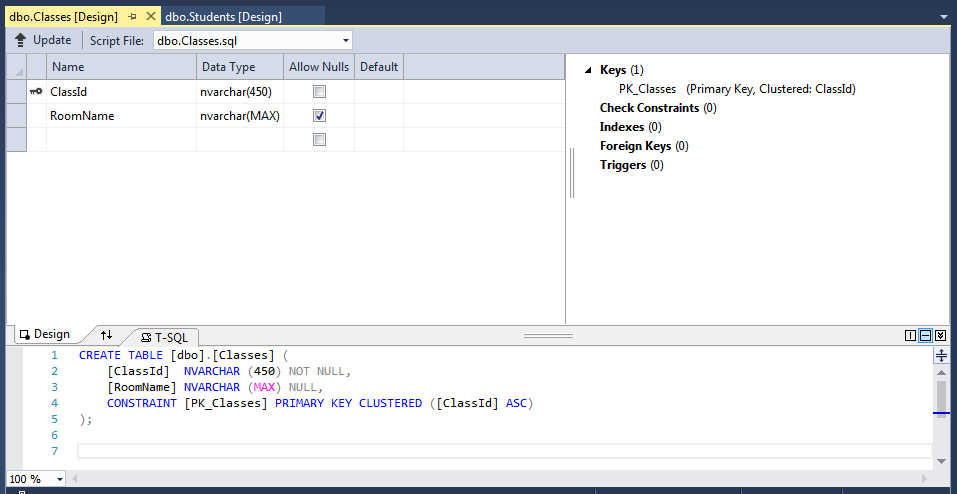
In the real world, a student belongs to a class. The class is characterized by a name, a room used for the lecture and, of course, by a set of students.
Let’s add a class to the model which represents this concept.
Add to the Model folder the Class.cs file and insert the following code:
Now we can apply these changes to the database running:
Update-Database
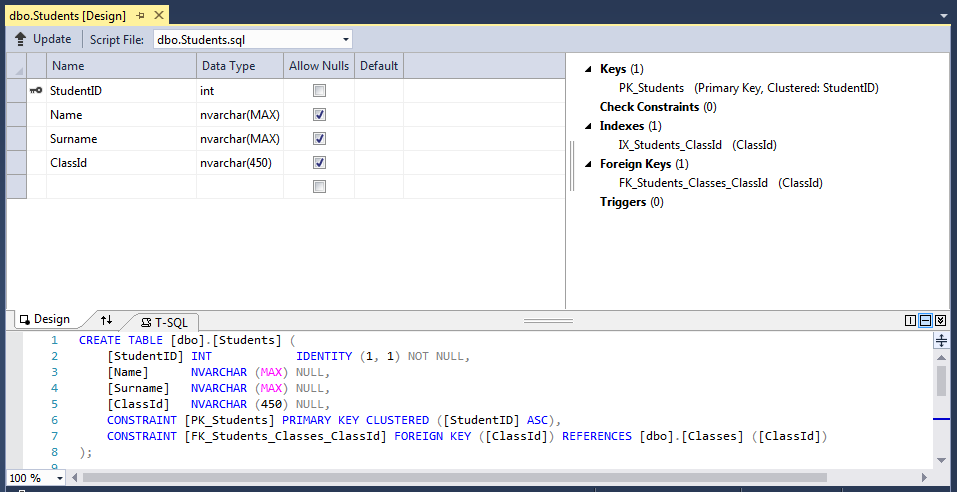
Students table view after the Classes MigrationStudents table view
As you can see, EF automatically infers the 1:N relation between Students and Classes and generates the foreign key in the Students table. That’s very elegant!
Undoing a database update
What can we do if the migration we have applied was wrong?
Fortunately, EF provides also this scenario.
If you want to undo the Update-Database command, you can just run a Update-Database followed by the name of the migration you want to rollback.
For example, if we want to come back to the previous state, when we had only the Students table, just run:
Now it’s time to generate the database. With EF core is a very simple operation, you only have to run:
Entity Framework Core is the brand new ORM framework that allows a .NET Core developer to work with a database without worrying about writing data-access code and mapping the object model with the relational model.
It has also some features that makes it more than a simple ORM: with EF Core , a developer can generate the relational model given the object model, or viceversa.
With the code-first approach, once you have generated the Model following certain conventions, you will be able to automatically generate the entire database and map the model classes with the generated relational tables.
To use the EF Core with this approach, we need to install the packages which provide the EF commands and the database provider (in this example we will use SqlServer).
We can procede using the Nuget Package Manager Console, but we can use also the NuGet GUI window.
The packages to be installed are:
Microsoft.EntityFrameworkCore.SqlServer
Microsoft.EntityFrameworkCore.Tools -Pre
Microsoft.EntityFrameworkCore.Design
Before installing a package, we need to check the dependencies that it requires.
Running the Install-Package Microsoft.EntityFrameworkCore.SqlServer command, it will install the latest version of the package (currently 1.1.0).
This package depends on other packages with version >= 1.1.0, but in my environment I have installed the LTS version 1.0.1. We have an issue.
There are 2 possible solutions:
update the .NET core environment to the non LTS version
install the Microsoft.EntityFrameworkCore.SqlServer package selecting a version which requires dependencies >= 1.0.1
In this case, I prefer to mantain the LTS version of .NET Core framework (1.0.1), so I’m going to install an ‘old’ version of the Microsoft.EntityFrameworkCore.SqlServer package.
Looking at its NuGet page, in the Version History section, I can see all its versions.
Clicking on one version, its detailed page will be shown, so I can check the version required for each dependency.
Once I have finished to check the dependencies, I have found that the version 1.0.1 of the Microsoft.EntityFrameworkCore.SqlServer is the latest compatible, so I choose to install it.
To do so, I have to run on the Nuget Package Manager Console: Install-Package Microsoft.EntityFrameworkCore.SqlServer -Version 1.0.1
After a few seconds (once the Restoring packages label on the top of Solution Explorer tab fades away), the package is installed in the selected project (the one selected in the Default project comboBox in the Package Manager Console tab).
Now, let’s do the same operations also for Microsoft.EntityFrameworkCore.Tools and Microsoft.EntityFrameworkCore.Design packages.
Run the following commands in the Nuget Package Manager Console:
Make sure that the version corresponds to the one you have installed some minutes ago.
Setup EF core on VS for database-first approach
If you already have a database, you can generate the model by your database schema.
To setup the EF core framework to work in this way, we have to install the packages required for the code-first approach plus the Microsoft.EntityFrameworkCore.SqlServer.Design